Santa Cruz Trek Peru: Complete Guide, Itinerary, Costs & Tips
A High-Altitude Journey Through Peru’s Most Iconic Andean Landscapes
The first time I crossed Punta Unión, the wind hit hard and the entire valley opened beneath me — sharp peaks, glacial lakes, and that raw silence you only find deep in the Andes.
The Santa Cruz Trek isn’t just one of Peru’s most famous routes. It’s where a lot of people fall in love with high-altitude trekking for the first time.
But it’s also where people underestimate the altitude, pack wrong, or show up unprepared.
This guide breaks down everything you actually need to know — from the real difficulty to logistics, costs, and how to plan it properly.
Quick Facts
Santa Cruz Trek Overview
Distance: ~50 km / 31 miles
Duration:
4 days / 3 nights
Highest Point:
Punta Unión Pass (4,750 m / 15,584 ft)
Difficulty: Moderate
Start Point:
Vaquería or Cashapampa
End Point: Cashapampa or Vaquería
Best Time: May – September
Why This Trek
The Santa Cruz Trek is often called one the best multi-day treks in Peru — and for good reason.
You move through the heart of the Cordillera Blanca, surrounded by peaks like Alpamayo and Artesonraju, with changing landscapes each day.
Unlike shorter hikes, this one gives you time to adapt, settle into the rhythm, and experience what trekking in the Andes really feels like.
Day 1: Vaquería – Paria | Into the Valley
The trek begins high above, where the air already feels thinner and the landscape opens wide from the start in a little town called Vaquería. Kari who I did the Santa Cruz trek with and I began with our 30+lb packs ready to tackle the 4 day trek ourselves. We met a few others doing the trek themselves, but most people were in an organized tour. We found the start trail and went down for a bit through green, grassy landscapes until we started gradually walking up with a gradual descent, winding through quiet alpine terrain and scattered stone houses where local families still live and work the land. You’ll pass herds of donkeys and cattle, and a few locals offering you porter services and warning you that the second day is the worst(which it is the toughest). As you moved deeper into the valley, the Cordillera Blanca and the 6,000 meter peaks begin to reveal themselves, and you start to realize how truly small you really are. Kari and I decided to stop for a coc leave tea and enjoy the view. Day 1 is gradual, it's long, but it does not climb as much.
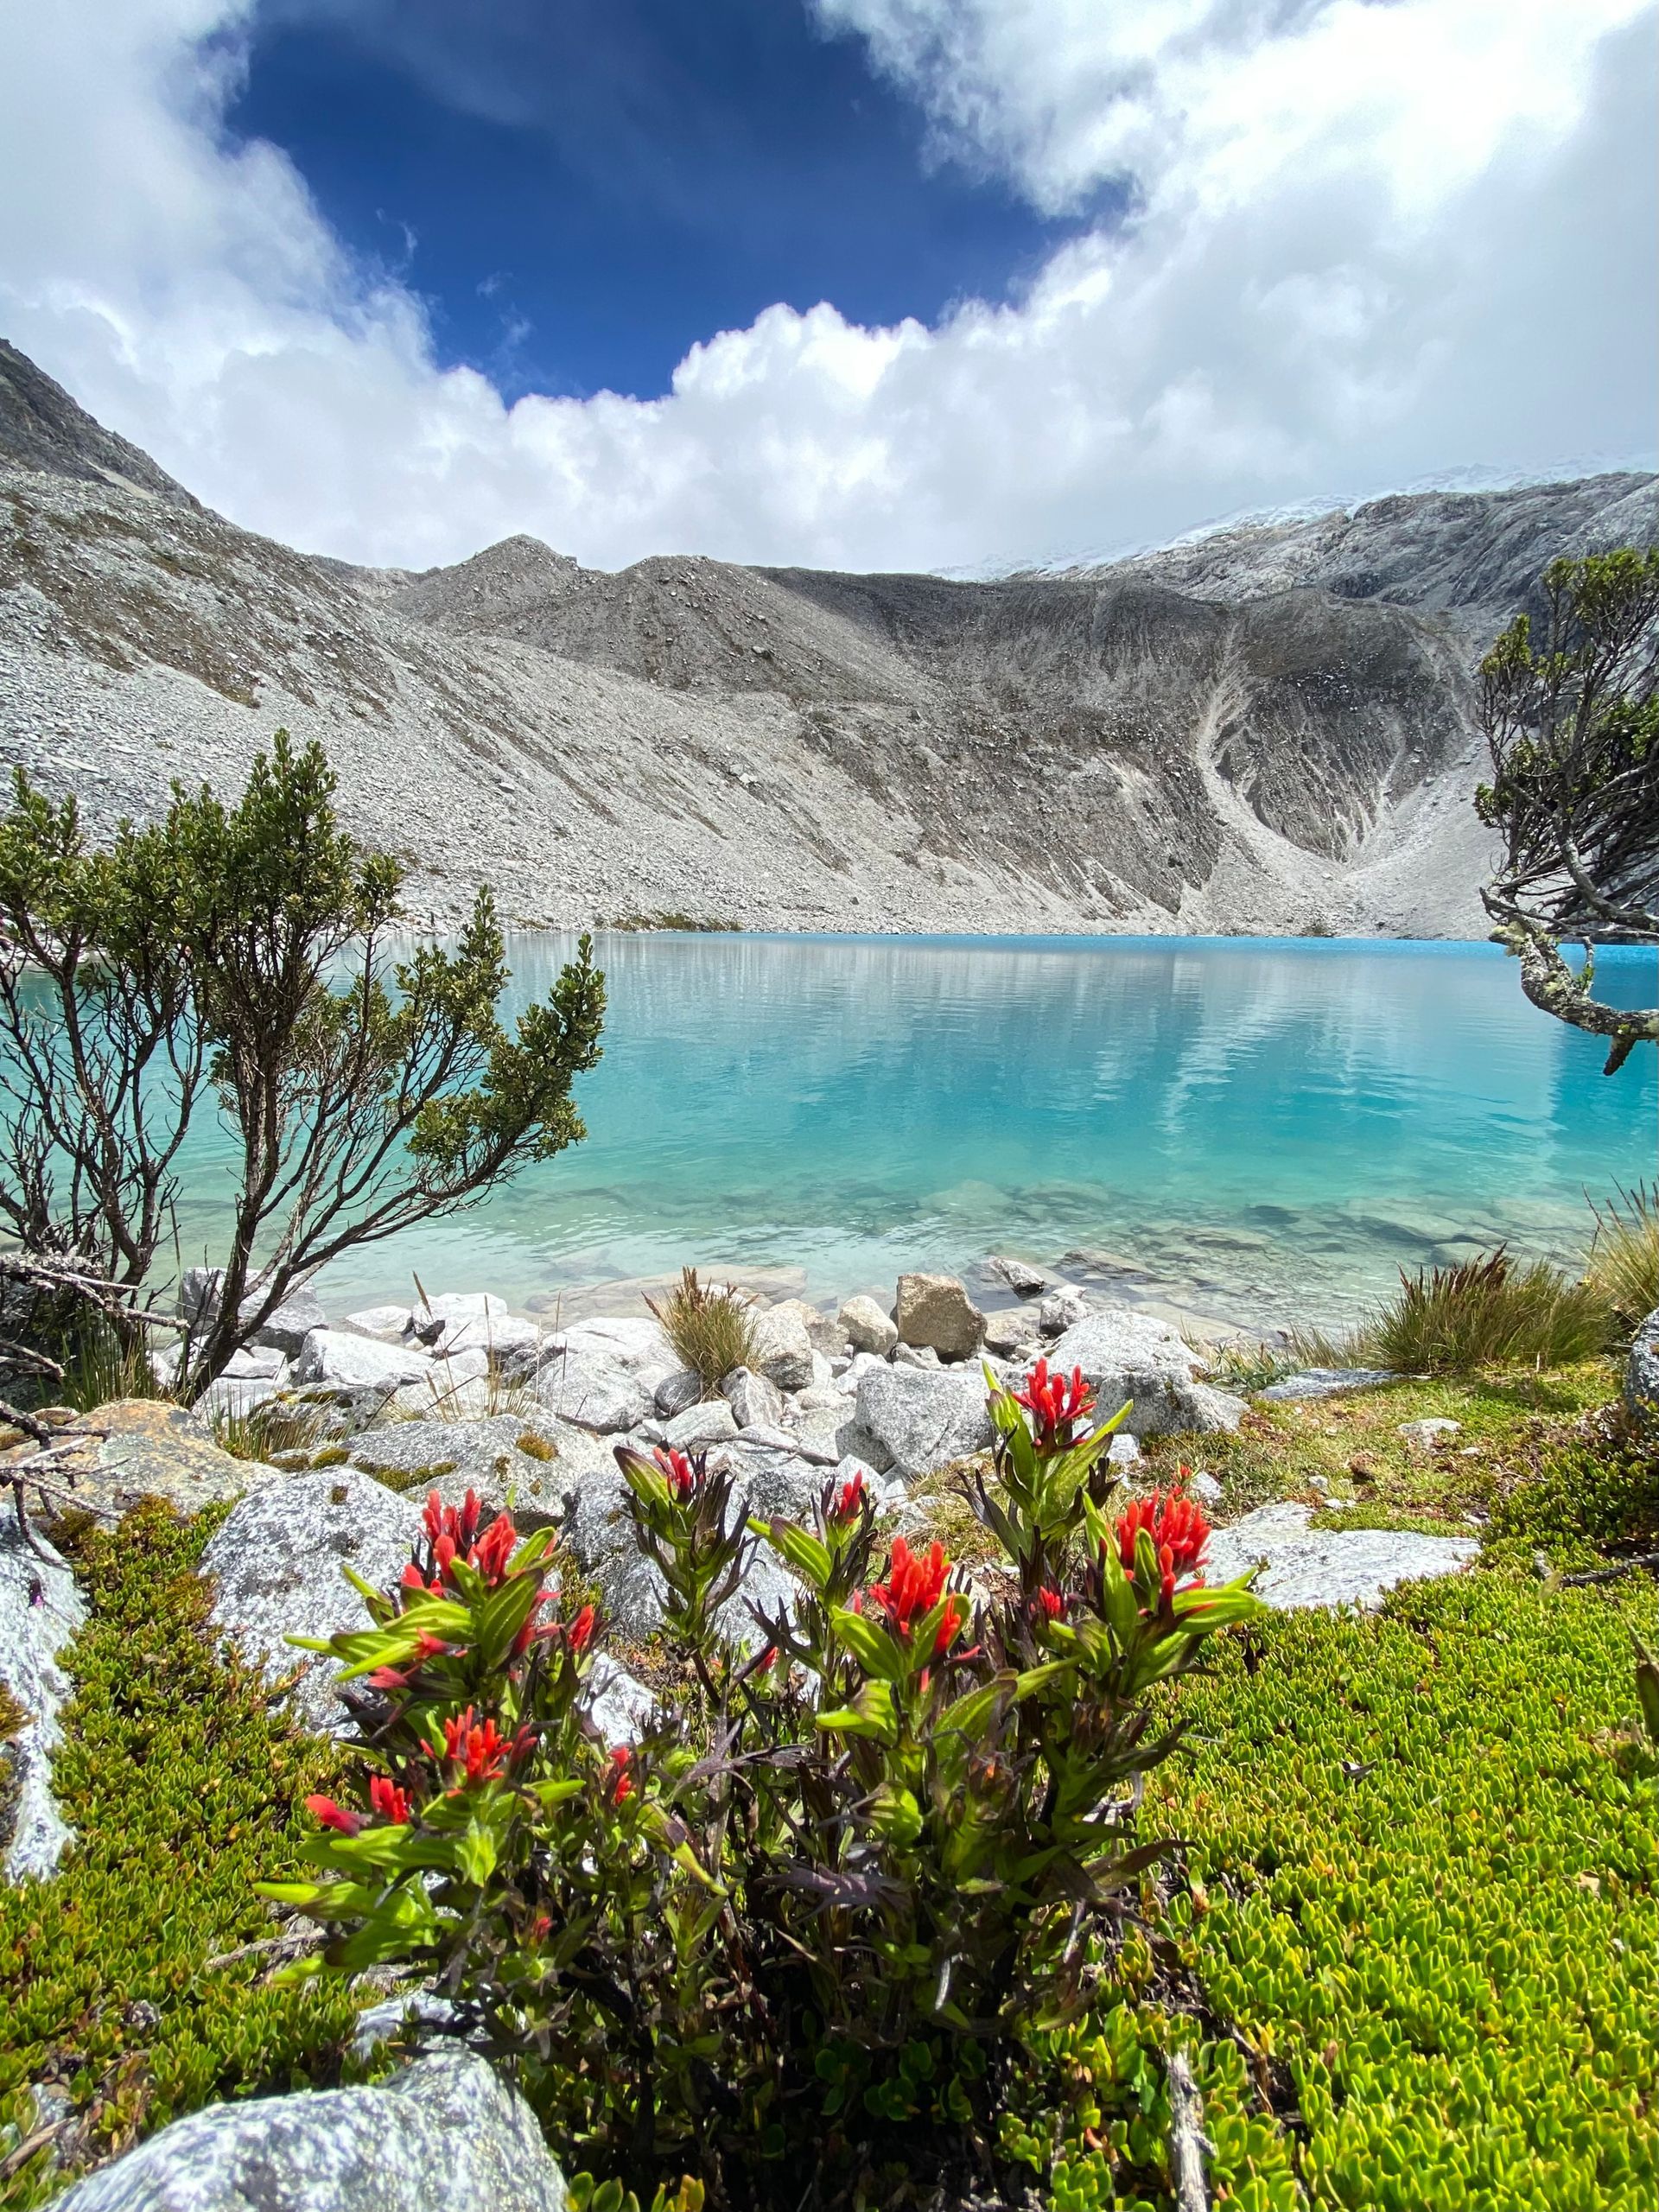
After 5 hours, we finally made it to the Paria campsite. The landscape opens into a wide, quiet basin surrounded by steep, rugged slopes. It’s one of the more understated camps on the trek, it has glacier views of Nevadon Paron and a sense of space and isolation that sets the tone for the days ahead.
The camp itself sits on relatively flat ground with plenty of room for tents and near a small stream that runs down from higher in the valley. As the sun drops behind the mountains, temperatures fall quickly, and the calm of the valley becomes more noticeable — no wind, no crowds, just the occasional sound of water and distant animals. When we were there, there was a heard of cow and even a very friendly, curious calf near our campsite. You’ll often see local farmers moving through the area or grazing livestock nearby, a reminder that this valley is still actively used by the communities who live here. With no light pollution, Paria becomes one of those camps where the stars feel close enough to reach, and the trek begins to feel more remote.
Elevation gain: ~900 m / 2,950 ft
Elevation loss: Minimal
Distance: ~11 km / 6.8 miles
Hiking time: ~5–6 hours
Campsite elevation: ~4,100 m / 13,450 ft
Highest point: ~4,100 m / 13,450 ft
Difficulty: Moderate
A mile into the trek, you begin to see views of Chacraraju and Piramide de Garcilaso
Day 2: Paria – Taullipampa | Deep in the Range
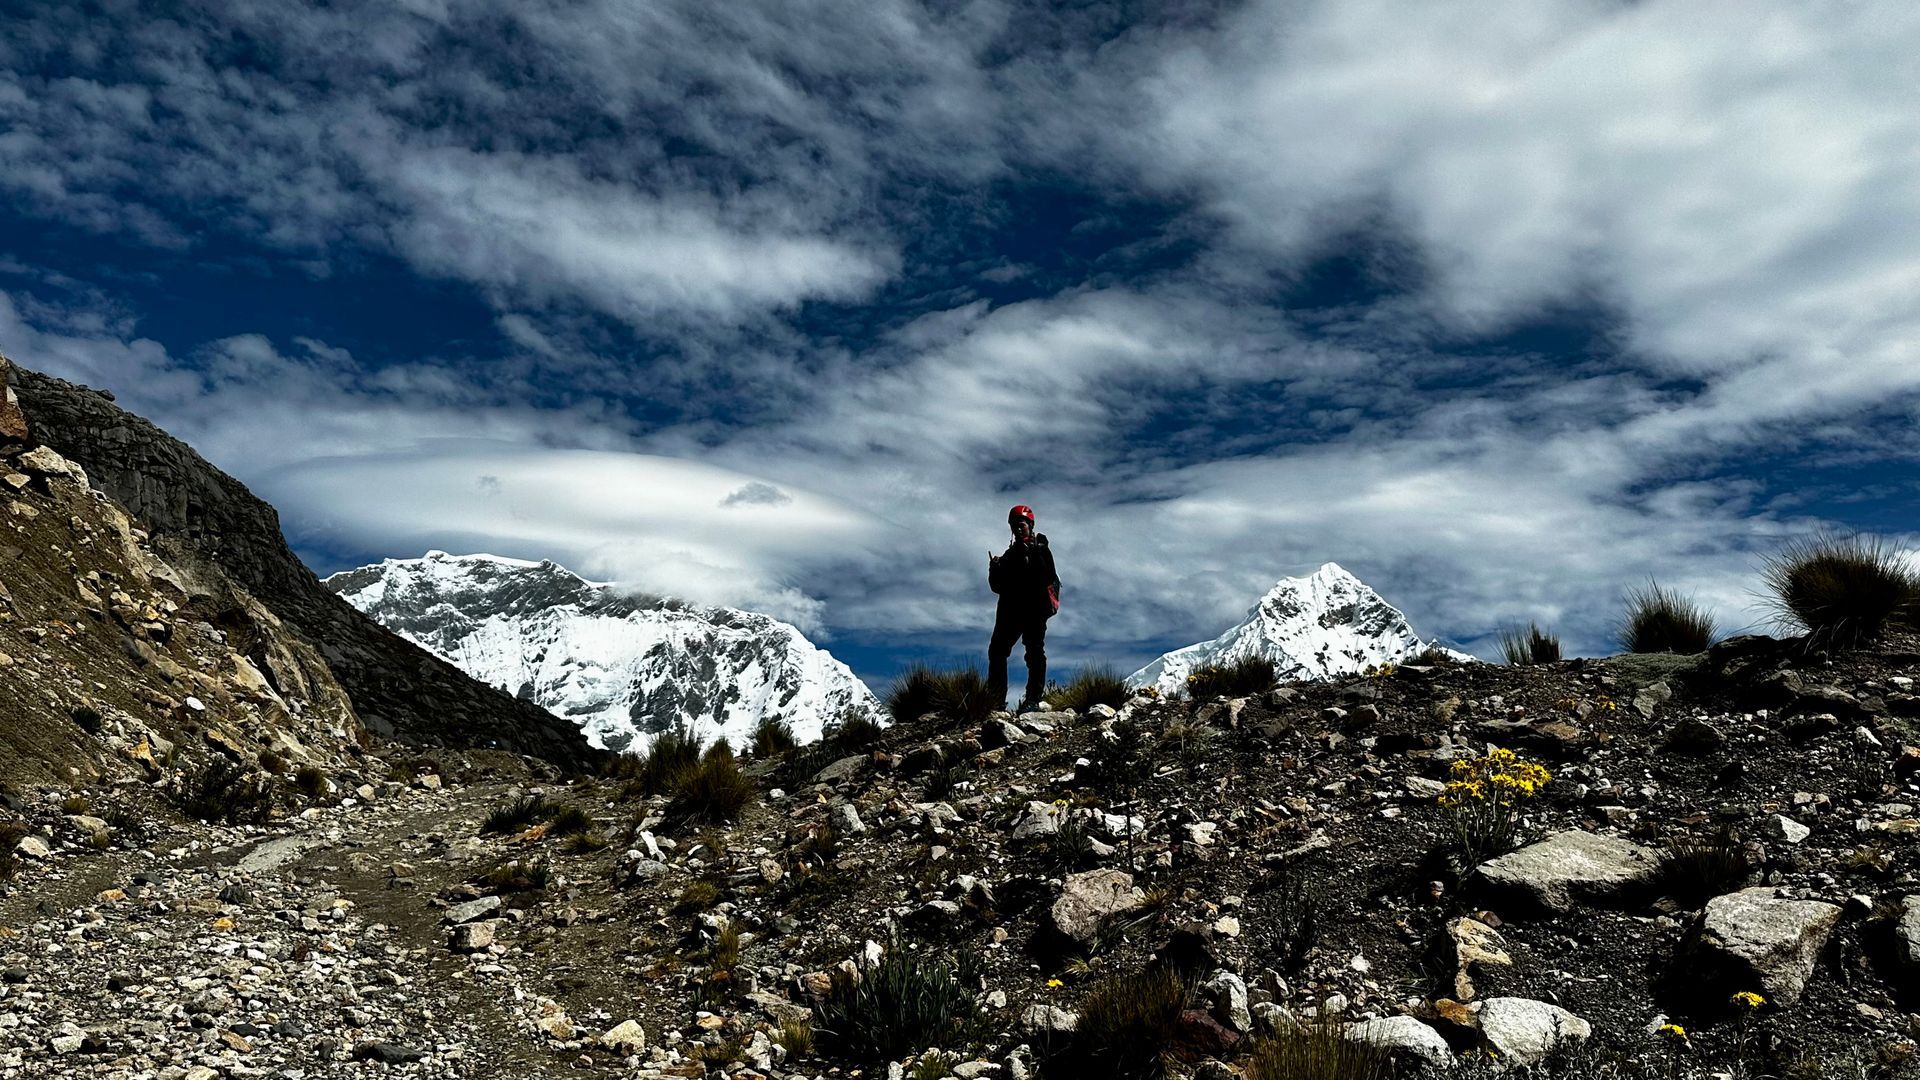
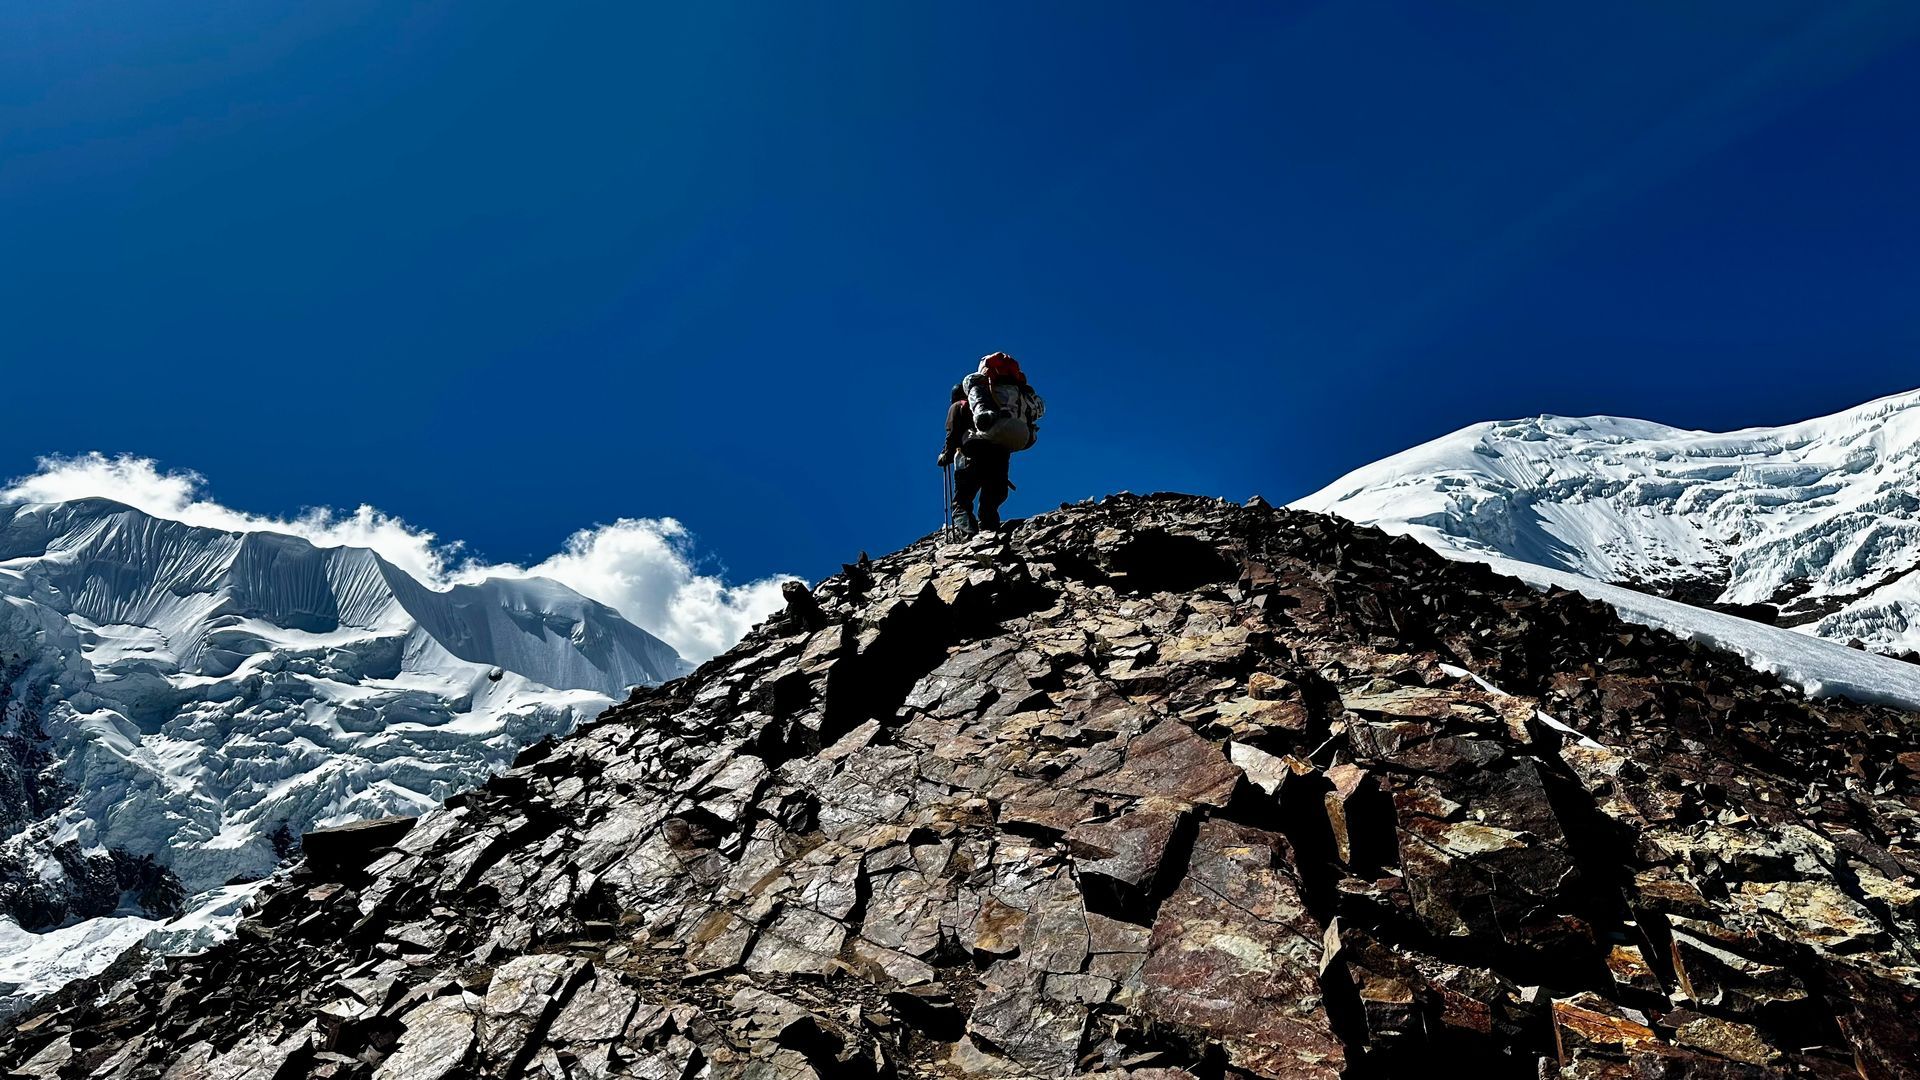
Today is the most demanding and visually rewarding stage of the trek. When Kari and I did it, it was sunny and hardly and clouds in sight. We begin with a steady climb toward Punta Unión Pass, one of the most spectacular viewpoints in the Cordillera Blanca. We past a few groups also carrying all their packs. It's a steady climb that gets much harder. The highest point is 15,584. There are water sources along the path until a certain point, so we made an effort to keep our water levels high because it's a few miles before and after punta union until you found a good water source.
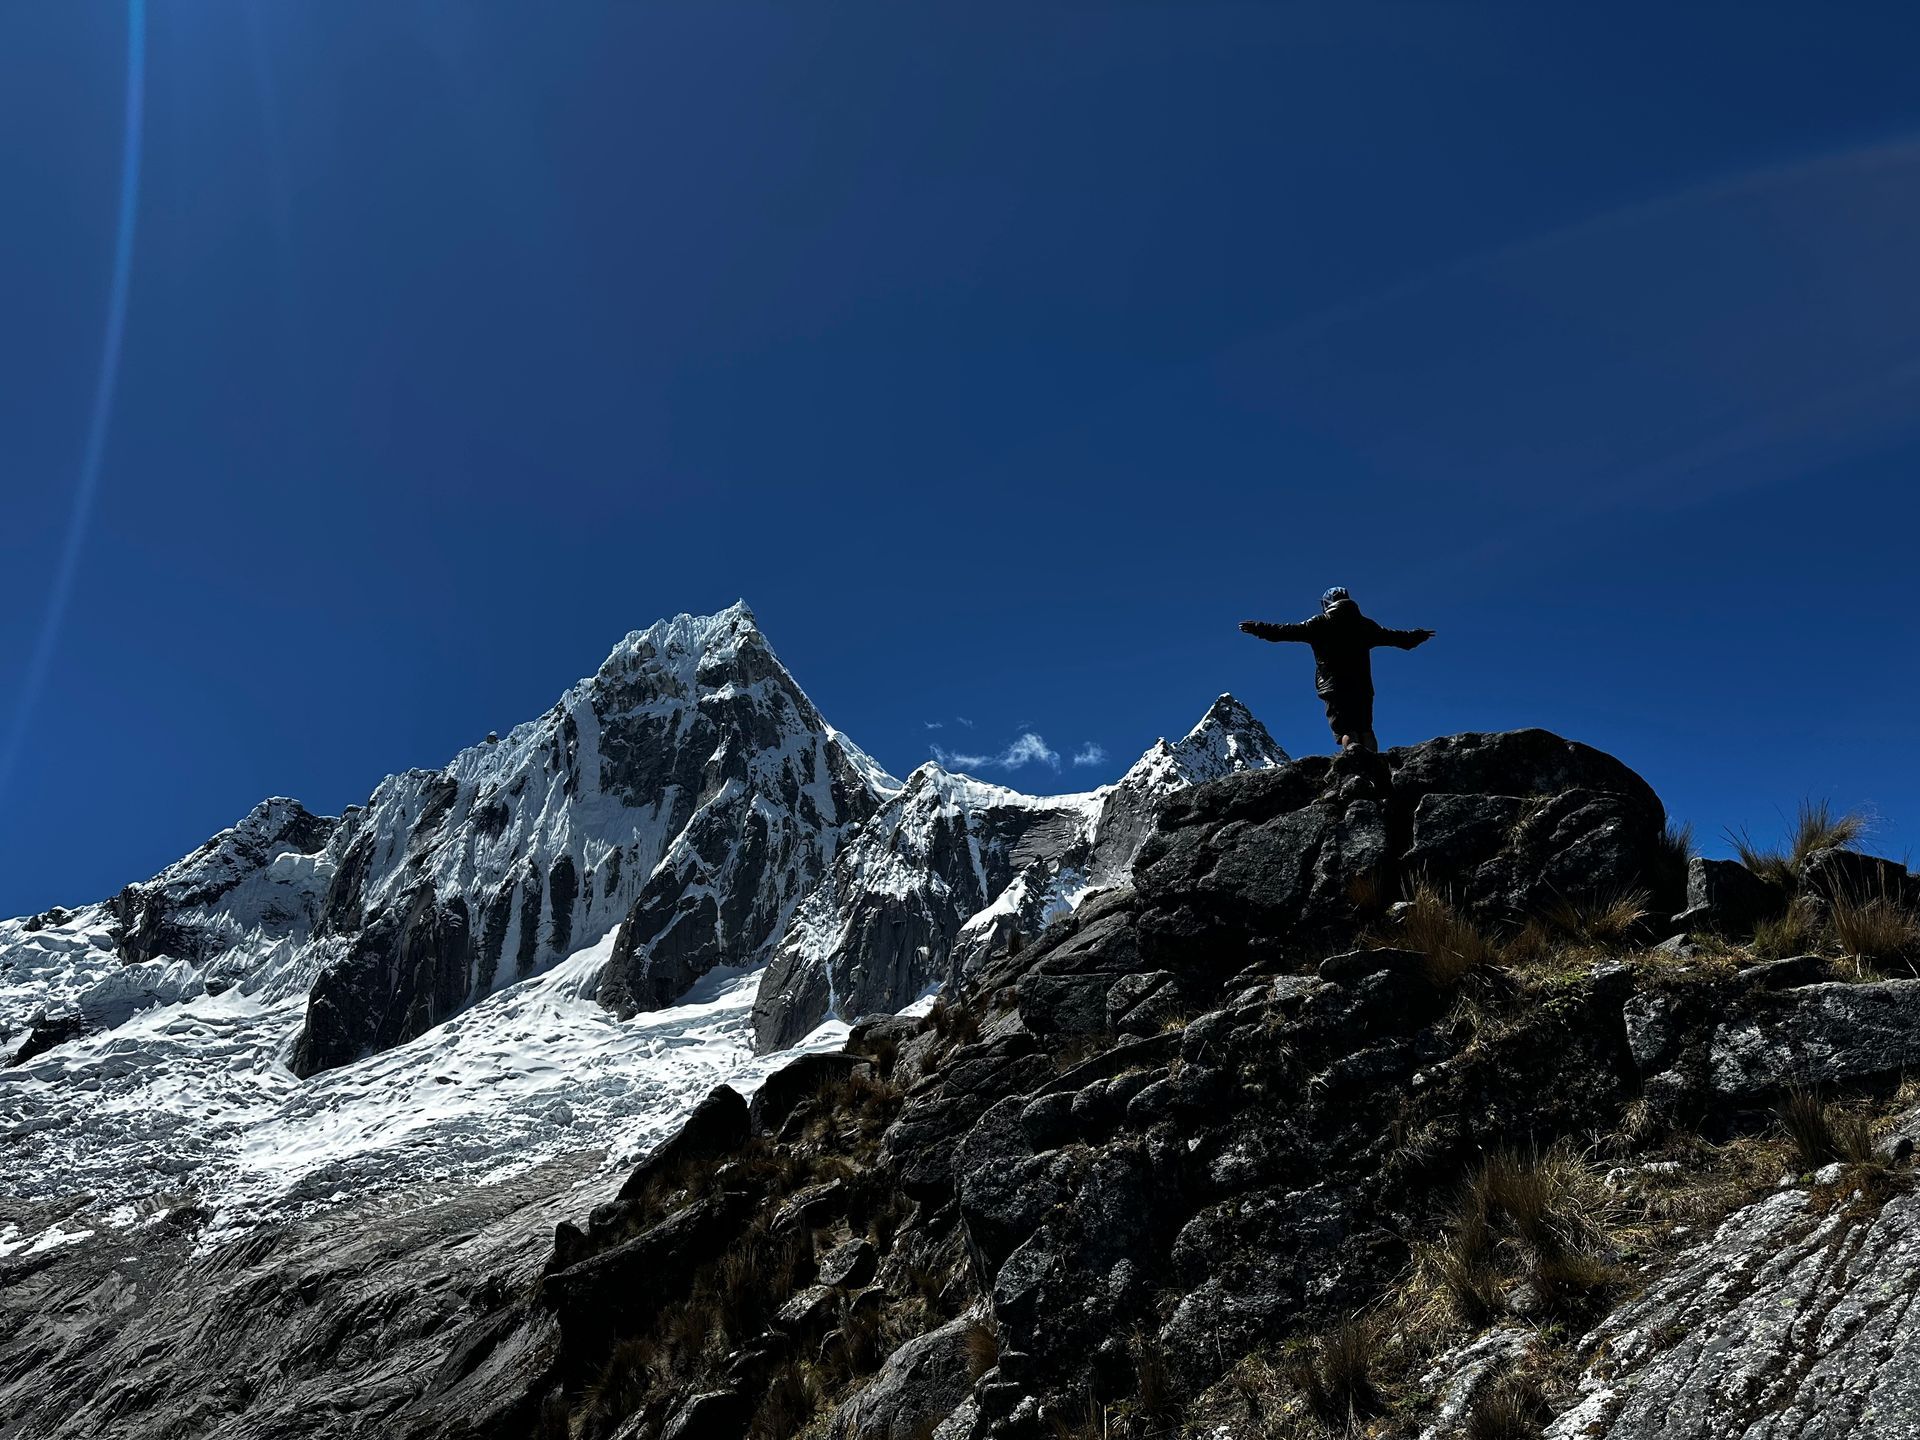
It took us about 3 hours to get to punta union and when we got there, the views were spectacular one of the most beautiful landscapes I have ever seen. Massive peaks like Taulliraju, Artesonraju, and surrounding glacier walls dominate the skyline, creating one of the classic panoramas of the Santa Cruz circuit. We decided to boil up some water to make a nice cup of coffee at 15,000ft.
After time at the pass, we descend into the Santa Cruz Valley. The terrain shifts from rocky alpine slopes into greener valleys fed by glacial rivers. Camp is set at Taullipampa, a stunning meadow surrounded by towering granite and ice-covered summits and Artesonraju, nicknamed "The Paramount" mountain.
Elevation gain: ~650 m / 2,130 ft
Elevation loss: ~900 m / 2,950 ft
Distance: ~13 km / 8 miles
Hiking time: ~7–8 hours
Campsite elevation: ~4,250 m / 13,945 ft
Highest point: ~4,750 m / 15,584 ft
Difficulty: Challenging
Accommodation: Expedition tents
The view entering the Punta Union area, the scenic mountain pass and highest point of the Santa Cruz Trek.
Day 3: Taullipampa – Arhuaycocha – Llamacorral | Glacier Lakes and Towering Peaks
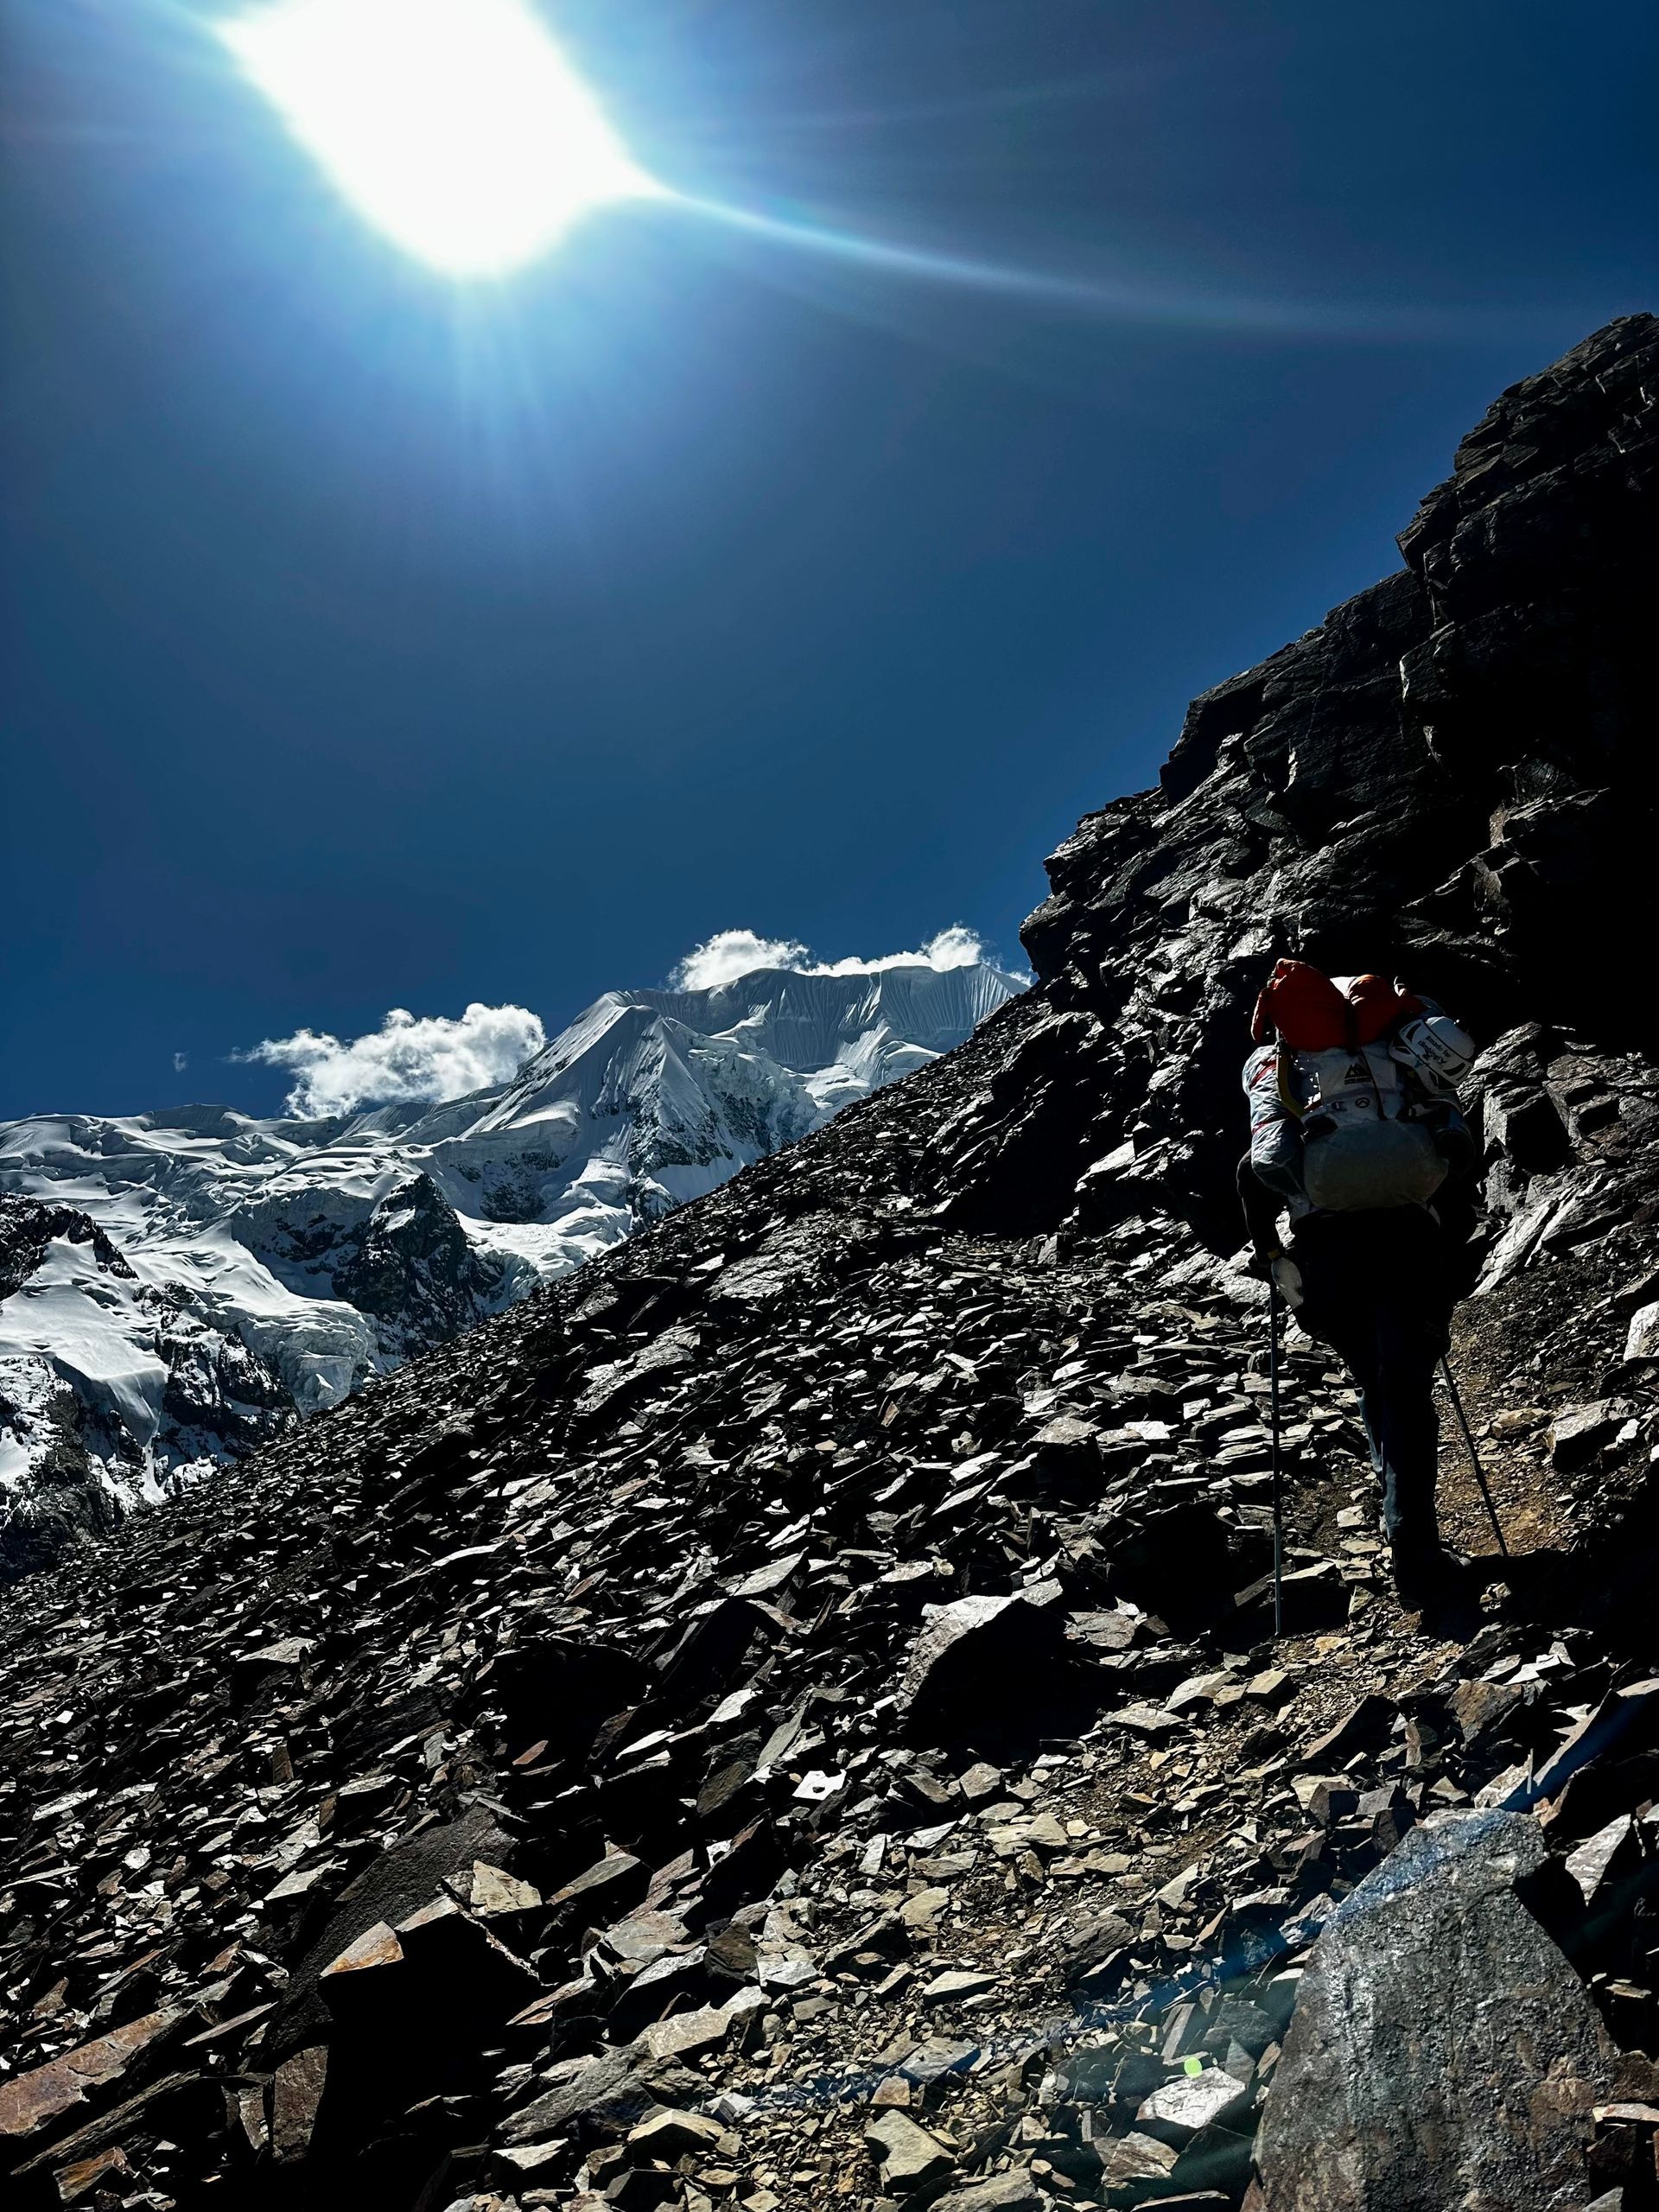
This morning, we made our coffee and our breakfast and debated whether to leave camp and take a scenic detour to Arhuaycocha, a glacial lake tucked beneath some of the most dramatic mountains in Peru and right underneath Alpamayo. The climb itself adds about 3 miles and 300 meters(900 ft) of hiking, but we decided it was a must, and it was well worth the hauling of our 30lb packs. We ended up staying there for an hour.
After soaking in the views, we return to the main trail and descend gradually through the Santa Cruz Valley. The landscape becomes softer and greener as we follow the river toward Llamacorral, where camp is set in a peaceful valley surrounded by high cliffs and waterfalls and very curious and hungry donkeys!
Elevation gain: ~350 m / 1,150 ft
Elevation loss: ~850 m / 2,790 ft
Distance: ~14 km / 8.7 miles
Hiking time: ~6–7 hours
Campsite elevation: ~3,750 m / 12,300 ft
Highest point: ~4,450 m / 14,600 ft
Difficulty: Moderate
Accommodation: Expedition tents
The second night campsite with views of Artesonraju(the Paramount mountain) and Nevado Paron Grande.
Day 4: Llamacorral – Cashapampa | Final Descent Through the Valley
The final day is a gentler descent through the lower Santa Cruz Valley. The trail follows the river through narrowing canyons, lush vegetation, and increasingly warmer terrain.
As we lose elevation, the alpine environment slowly transitions into rural Andean farmland. Small villages, stone walls, and cultivated terraces begin to appear again, signaling our return to lower elevations.
We arrive in Cashapampa, where the trek concludes. Though the route ends here, the landscapes crossed over the past four days leave a lasting impression for us. From remote valleys and high passes to glacier lakes and iconic peaks, the Santa Cruz Trek was one of the best backpacking adventures I have ever taken.
Elevation gain: Minimal
Elevation loss: ~900 m / 2,950 ft
Distance: ~10 km / 6.2 miles
Hiking time: ~4–5 hours
Ending elevation: ~2,900 m / 9,514 ft
Highest point: ~3,750 m / 12,300 ft
Difficulty: Moderate
Accommodation: Trek ends / private transport out
Donkeys in the last night's campsite: Jomanda.
Difficulty & Reality Check
The Santa Cruz Trek is often described as a moderate trek in Peru, but that can be misleading. It's moderate to certain standards and other treks you encounter in Peru like the Huayhuash Trek While the trail itself is non-technical — no ropes, no exposure, no climbing experience required, the real challenge is high altitude trekking in the Cordillera Blanca.
From the very first day, you’re already above 3,700 meters, and the route quickly takes you higher. By the time you reach Punta Unión Pass (4,750 m / 15,584 ft), you’re well into an elevation where oxygen levels are significantly lower. This is where even strong, experienced hikers begin to feel the effects.
Altitude, not terrain, is what makes the Santa Cruz Trek difficult.
Above 4,000 meters, even the simple things become harder:
breathing feels shallow
your pace slows down
recovery takes longer
headaches and fatigue are common
If you arrive without proper acclimatization, the trek can go from enjoyable to exhausting very quickly. This is why spending time in Huaraz before starting is not optional, it’s essential. Three days of acclimatizing is essential.
Another factor to consider is the multi-day nature of the trek. While each individual day is manageable, the cumulative effect of hiking several hours a day at altitude adds up. Day 2, which includes the climb to Punta Unión, is where most people feel the full weight of the altitude.
The biggest mistake trekkers make is assuming that because it’s a “popular” route, it’s easy. In reality, the Santa Cruz Trek sits in a category of accessible but demanding high-altitude hikes perfect for those prepared, but unforgiving if underestimated. Unfortunately, we did meet someone who actually had to be rescued out because of the fact she struggled so much and could not continue passed Punta Union.
If you approach it with proper acclimatization, realistic pacing, and the right mindset, it becomes one of the most rewarding treks in Peru. If not, it can be a struggle.
What We Packed
Layers for cold nights
We both did it in trail runners but hiking boots also work for ankle support
Sleeping bag (−10°C/14°F recommended for colder folks) I took a sleeping bag rated for -6°C/20°C
Rain protection- it was sunny every day but rain did hit us a few times in the afternoon. The weather can be unpredictable in the mountains
water purification- we both took our GRAYL which is a type of water press.
Layers for hiking during the day. Our two person expedition style tent which we shared.
Hiking pants
We both brought a 70 liter backpack.
We shared a cooking stove and each had our own propane cylinder.
Meals for 4 days and one extra day in case we got hungry and snacks for the in-between.
For a complete list, check out our packing list for hikes, treks, and big expeditions here.
Cost Breakdown
Understanding the cost of the Santa Cruz Trek depends on how you choose to do it — independently or with a guided expedition. Both options are possible, but they offer very different experiences.
Independent Trek Cost
If you organize everything yourself, the Santa Cruz Trek is relatively affordable:
- Transport (round trip from Huaraz): ~$30–$60
- Food for 4 days: ~$40–$80
- Gear rental (tent, sleeping bag, stove): ~$40–$100
- Park entrance (Huascarán National Park): ~$20–$60(for a month pass)
Estimated total: ~$150–$300
This option requires:
- carrying your own gear
- planning logistics
- navigating the route yourself
It’s a good choice for experienced trekkers comfortable at altitude.
Guided Trek Cost
Most travelers choose a guided trek for convenience and safety.
- Budget group tours: ~$400–$600
- Mid-range small groups: ~$600–$800
- Private or premium expeditions: ~$800–$900+
Typically includes:
- transport
- meals
- tents and camping gear
- guide and support team (often mules or donkeys)
Guided treks remove most logistical stress and allow you to focus on the experience, especially important for first-time high-altitude trekkers.
How to Get There
The Santa Cruz Trek starts in the Ancash region of northern Peru, with nearly all routes passing through Huaraz — the main base for trekking in the Cordillera Blanca.
Step 1: Get to Huaraz
- Bus from Lima (8–9 hours overnight)
- Flights to nearby cities + ground transfer (less common and more expensive)
Step 2: Reach the trailhead
There are two main starting points:
- Vaquería (higher start, more gradual route) - Our recommendation
- Cashapampa (lower start, steeper first two days)
Transport options:
- Organized through tour operators (most common)
- Shared colectivos (local minibuses) from Huaraz or your hostel
- Private taxi for flexibility
Most guided treks handle all transport, while independent trekkers need to coordinate this in advance.
Best Time to Go
The best time to do the Santa Cruz Trek is during the dry season in the Peruvian Andes.
Dry Season (May – September) → Best conditions
- Clear skies
- Stable weather
- Strong mountain views
This is peak trekking season in the Cordillera Blanca and offers the most reliable conditions.
Shoulder Season (April & October)
- Fewer crowds
- Mixed weather
- Occasional rain
Still possible, but less predictable.
Rainy Season (November – March) → Not recommended
- Frequent rain
- muddy trails
- limited visibility
While the trek is still open, conditions are significantly less enjoyable.
My Tips (Real Experience)
This is where preparation makes the biggest difference on the Santa Cruz Trek.
Acclimatization is everything
Spend at least 2–3 days in Huaraz before starting. Do shorter hikes first — your body will thank you later. We did the day hike to Churup, Llaca, and Laguna 69 before we attempted the Santa Cruz Trek.
Day 2 is the real challenge
The climb to Punta Unión isn’t about speed.
Slow, steady pacing is key — rushing at altitude will drain you quickly.
Food matters more than you think
At altitude, appetite drops.
Bring snacks you actually enjoy — energy bars, chocolate, nuts — anything easy to eat when you’re tired. Don't eat too much sugar. Yes, it does give you a boost in energy, but it can make you nauseous at high altitude. Bring a variety and balance it out.
Be ready for cold nights
Even in peak season, temperatures drop below freezing at camp.
A proper sleeping bag (−10°C recommended) makes a huge difference in recovery.
Don’t underestimate the trek
It’s one of the most accessible high-altitude treks in Peru, but it is still a serious one.
Treat it with respect, prepare properly, and it becomes one of the most rewarding experiences in the Andes.
Plan Your Santa Cruz Trek
Planning to trek the Santa Cruz route?
We organize guided expeditions with the right pacing, acclimatization, and local support — so you can focus on the experience, not the logistics.
From your first day in Huaraz to crossing Punta Unión, everything is structured to give you a smoother, safer, and more rewarding trek through the Cordillera Blanca.
Take the next step
Why trek with us?
✔ Local, on-the-ground experience in the Andes
✔ Small groups and private expeditions
✔ Focus on acclimatization and safety
✔ Direct communication — no middlemen
Need help planning?
→
Get a custom itinerary through email
→ Look for the whatsapp icon and message us directly on
whatsapp